Showing posts with label SCA. Show all posts

15 December, 2013

16th Century Linen Kirtle Project: Complete

Hi everyone!

It has been so long since I last blogged at all and even longer than that since I last blogged about the 16th Century Linen Kirtles that I was making as an SCA project.

In case you're not aware of my project, let me direct you to some of the previous, relevant posts. Firstly, my 16th Century Kirtle Update includes some pictures and ideas about the sort of dresses that I wanted to make. Next, Patterning Success! details the process of me being patterned for the kirtles (guest starring Rosie, who did all the hard work). Then I did updates on my Blue Kirtle and my Cream Kirtle.

That last update came in January this year and since then I've barely done any work on the project. Until just recently, when I had a burst of motivation and finished it all off.

Blue kirtle first!

Here's what it looks like all spread out on my floor, in its finished state.

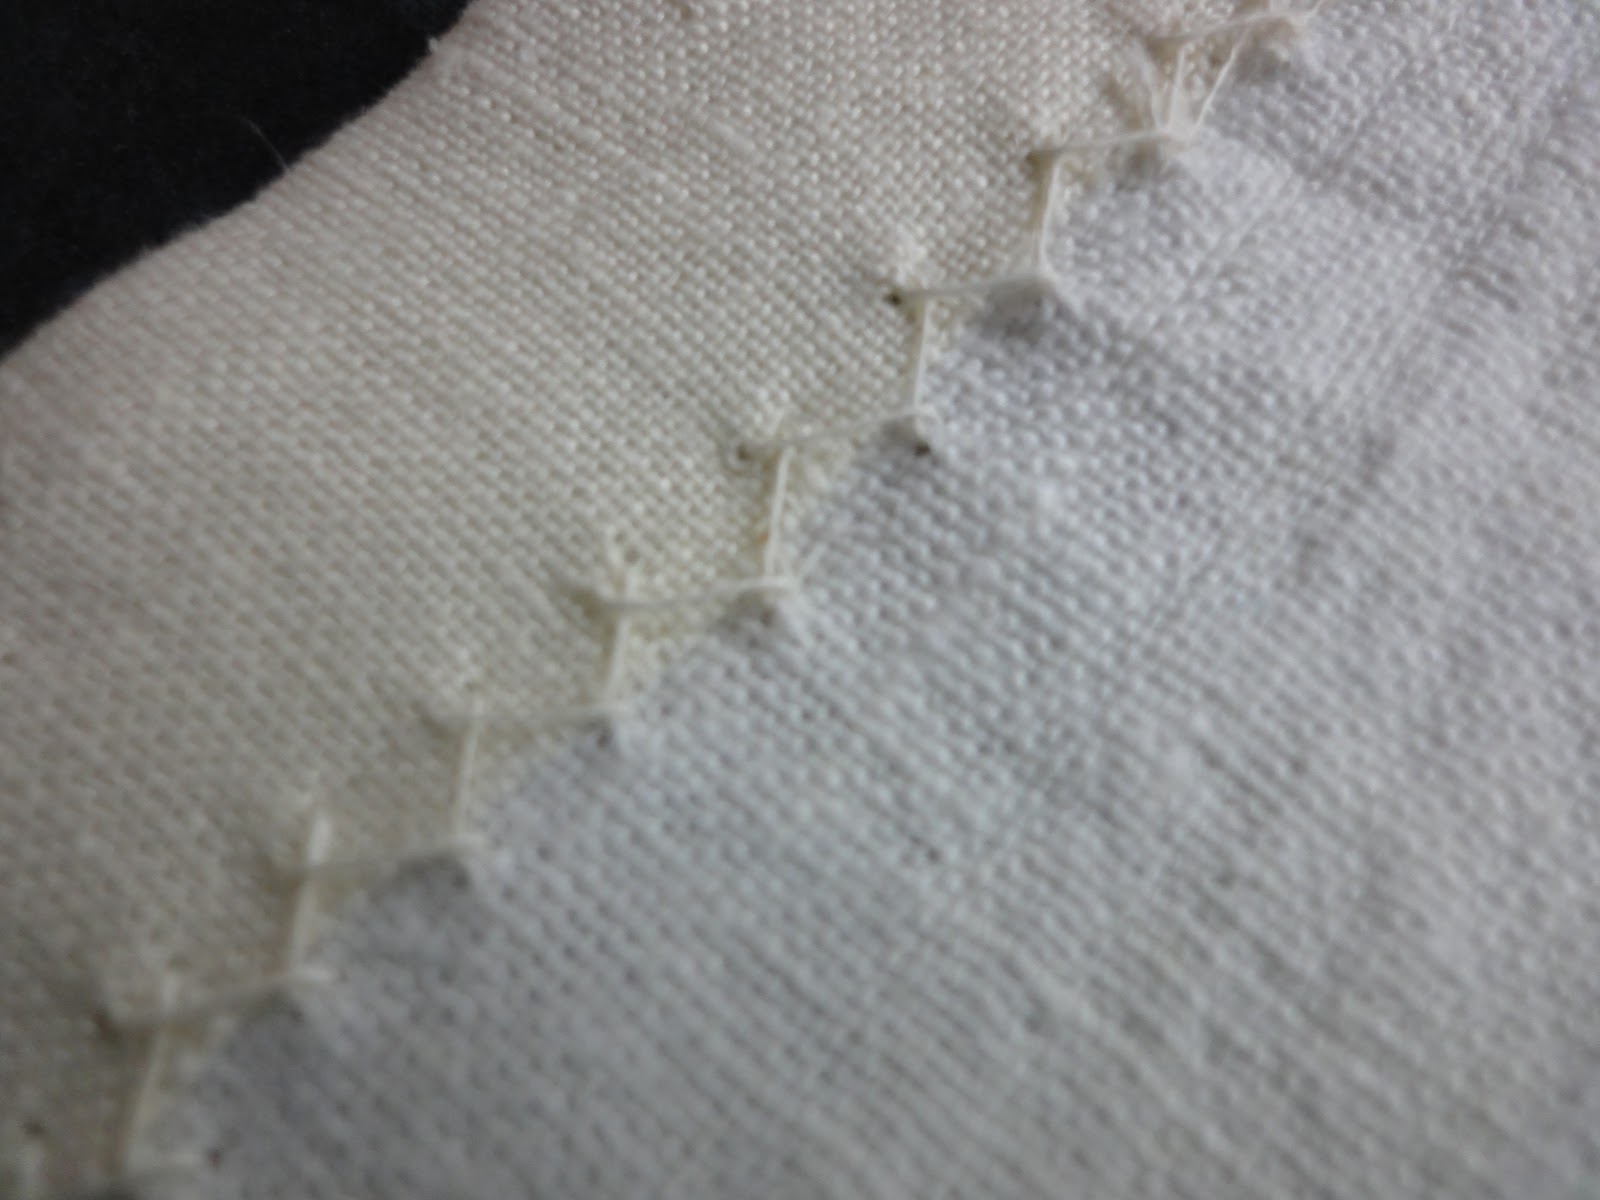
The hardest part of finishing this dress was the need for lacing holes. I got an awl as a belated Xmas gift. I love my awl. However, I definitely made my lacing holes too small and it has caused no end of problems, which is really disappointing.

Here's a picture of the lacing holes down the side of the dress:


And here's a picture of the two that I put in the shoulder. I did these much later, after I realised that I'd made all the original holes too small, so they're a better size.

Doing the lacing holes on this dress took a really long time because I wanted to sew them in matching thread. In order to do that, I had to find some matching thread. But linen thread is already pretty hard to find and it's even harder to find in the right colours. So what I did, on Rosie's advice (again - she was a total lifesaver during this project) was pull threads out of the leftover linen. It took ages to pull out enough threads, especially because they kept breaking as I was trying to extract them from the fabric. They also kept breaking while I was sewing the lacing holes, which is why quite a lot of them have little fuzzy bits sticking out.

Once I had the lacing holes sewn, I put in a make-shift lacing cord so that I could do the hem of the dress.

Here are pictures of the outside of the hem and the inside of the hem. I sewed most of the hem using my using plain white linen thread but I also did some of it using the blue threads that I had leftover. I probably should have stuck to the nice white thread because the stupid blue threads kept breaking everywhere. It's weird how they can hold together as fabric but not as individual threads.


Last but not least, I needed a proper lacing cord for the dress. I found some really cute aglets on the internet, from an eBay store in NSW. You can find them here: http://www.ebay.com.au/usr/medieval_shoppe. I was really looking forward to having aglets on the end of my lacing cords because it would make the whole lacing process so much easier. But I was very silly and didn't test the aglets on the lacing holes that I had already sewn... More on that tragedy in a moment.

I spent a lot of time contemplating the best way to make lacing cords. Originally, I wanted to do fingerloop braids. However, I decided against them because a) they can be pretty bulky and b) you have to knot them at the end or bind them and I'm so terrible at doing those binding things with thread. In the end, I went for lucet cords, which actually worked out pretty great in the end.

I made three lucet cords. Two blue ones, one for each side of the blue kirtle, and one white one for the cream kirtle. The thread that I using was the linen thread that I got from Ellen for my 21st birthday. I was planning to use it for weaving but I haven't yet.

I sewed my beautiful aglets onto the lacing cords. And then I found out that the stupid lacing holes that I had spent hours sewing were TOO SMALL. And the aglets were TOO BIG and thus could not fit through the holes. The holes that I did on the shoulders are actually the perfect size, but unfortunately I didn't make all the holes that size. So I took the aglets off the lacing cords. Luckily the lucet cords have quite small ends and they fit through my tiny lacing holes just fine. But still, ugh. I feel silly. And I will DEFINITELY make bigger lacing holes next time. That is a lesson well-learned.

Anyway, here's a picture of the blue lacing cord. It's a slightly different colour from the fabric of the dress, but I have unfortunately reached the point of not-caring. Also I don't think it really matters that much.


Onto the cream kirtle, which followed basically the same steps. Here are the lacing holes:


These ones look a lot nicer because the thread that I used was a lot nicer. The thickness of this dress made them a lot harder to sew, though. If there's anything that I learned from this project, making the interlining of the dress as thin as is practically possible is one of the most important steps. Mostly that's a comfort thing, because a heavier bodice is just really hot and uncomfortable. But also it's because I am sad about my aglets. Speaking of aglets and therefore lacing cords, here are some pictures of my lacing cord.


Here's the hem:


And here's a picture of the dress spread out on my floor, so you can see the whole thing:

So that's the end of the dress part of my linen kirtle project. However, the project also involved two more parts. 1. a shirt and 2. sleeves.

I made the shirt as soon as the blue dress was wearable and have been wearing it ever since, but it was only last night that I added the buttons. Which was a slight disaster, but I will tell you about that in a moment. First, here is a picture of the shirt (it needs ironing, I know):

And I thought you might also want a picture of the gussets under the arms. Gussets are kinda tricky but I worked it out and not only did I sew it but I also finished all the seams, so I think it turned out pretty neatly. It would probably look a lot better if it hadn't been worn and washed and badly ironed, but here it is:

I had some nice buttons from the button shop in NSW but unfortunately they have gone AWOL, so instead I used some of my stash of tiny wooden buttons that I have. When I made the shirt, I made a vital mistake at the collar and cuffs which was that I didn't leave any overhang for fastenings. So I put a button on the collar of the dress to make it look nice even though the collar can't actually meet around my neck... lol? I also put buttons on the cuffs. And I sewed buttonholes but they are TERRIBLE. And hardly even big enough. And I just don't even care that much to be honest, but maybe I'll fix them up later. Anyway, if I push hard then the buttons fit through the holes and I think they might be able to fasten around my wrists. But maybe not. I've been wearing it without buttons for so long anyway, it doesn't really matter. Here are some pictures:


Finally, I made sleeves. They're in a colour called Ginger; it's the same type & weight of linen as the dresses. I think the shirt is a little lighter, I think it's 3.5 and the others are 5.3 or something? Anyway, I whipped up the sleeves in about two days. I used the pattern straight out of the Tudor Tailor, which made it really easy. I pre-washed my fabric (very important step) and spread it out on my floor. I've been catching up on Season 4 of Warehouse 13 which means I've been working in my loungeroom. Carpet is so inconvenient, ugh. But luckily I have a big plastic board thing which I can work on and it makes the cutting out process easier.

I drew the pattern on using tailor's chalk. I have 4 colours so I always try to use one that will show up  but not show up too much. Anyways, I drew it on and added my seam allowance (this is the worst thing ever to forget; I'm so paranoid about it) and then cut it out. Then I turned it over and traced around it, because the sleeves need to be opposite to each other. Then I had to measure in the seam allowance. I like to draw in my lines because it helps me to sew straight, otherwise I end up all wobbly and by seam allowance is uneven and it's just a mess. I prefer to be precise, when I can. This is something that I started to learn about myself over the course of this project.

After I cut out both sleeves and had all my sewing lines marked, I sewed up the sides so that the flat piece of fabric became more sleeve-like. Then I flat-felled the seams. This involved finding out which sleeve was which, because I like to have the seams finished towards the back. You can't really see it on the outside unless you look super duper close for the tiny white flecks that show where it has been sewn. But it's the principle that counts, I guess, and I feel better for knowing that I've been consistent-ish.

Anyway then I just did a little rolled hem around the cuff and around the top of the sleeve, which I think turned out pretty well, although it's a little wiggly around the top, but I don't think it will be too noticeable when I'm actually wearing them.

Then I made four little lucet braids. I tried to pull enough brown/ginger threads out to make same-colour lucet braids to use for sleeve-tying. But they just kept breaking and it was really frustrating, so I ended up doing them in white, which I think is just fine. I sewed them on to the top of the sleeve so that they are permanently attached. That's something that I learned when I did my cotton kirtles for practice: it is very annoying having unattached strings for tying.

Here are some pictures of the sleeves:


And that is the end of my 16th Century Linen Kirtle project.

It's not perfect. There are a lot of things that I wish I had done differently, a lot of things that I will do differently in the future and plenty of things that I have learnt about sewing and about myself during the process.

It took a really long time, but that is mostly because of the time that I spent not doing the project rather than the time that I spent actually working on the project.

I'm just really glad to be finished with it, to be honest.

So where does that leave me?

Well, Aimee gave me some beautiful metal belt fastenings as a present after she went to Festival, so I will definitely be turning them into a belt as soon as I have the time/materials.

Also I'm going to Canterbury Faire early next year and I think I will need some extra garb, so I'm going to whip up another cotton kirtle. I would prefer to sew in linen but cotton is cheaper and easier to access, so that's what I'm going with. I think it will go quite quickly and turn out quite well because of all the things that I learned while working on my linen kirtles. I'm going to use just one layer of the grey horse-hair stuff as my interlining, I think that will be fine. Well, I'll find out, anyway!

After that finishing my hat project will be a priority, but I'll need a bunch of white linen for that so I will definitely need to save up a lot of money and do an order.

And then I will move onto bigger and better things, most notably a crazy foray into the 14th century because I want a cotehardie, maybe in like a Ginger or a Mustard colour and I have some lovely light blue linen to do an over-the-top cotehardie, with gold buttons and tippets and it will just look lovely I think.

Anyway now I'm just rambling so I'll sign off now.

I probably won't blog again this year, sorry!

MERRY XMAS! :D


♥Nancy♬

28 January, 2013

16th Century Cream Linen Kirtle


Hello!

A short time ago I blogged about my Blue Linen Kirtle and I finished that post with a lament about how I am lacking in awls. I haven’t got an awl yet so I haven’t continued work on the Blue Kirtle. However, I’ve still been sewing a lot and I’ve made good progress with my next kirtle.

UPDATE: Since writing this post I have, in fact, received my awl, but I've been sewing much slower so this post is basically still up-to-date.

Kirtle #2 is made using the same pattern that Rosie helped me with. However, it has a very different structure from the Blue Kirtle because it is front-lacing instead of side-lacing. It’s also cream-coloured. The top fabric is from Fabrics-store.com and it’s IL019 5.3 oz/yd2 in a colour called Krista. For the lining I used the same white linen that I used in my Blue Kirtle. The Cream Kirtle is also entirely hand-sewn using linen thread, except for the basting stitch where I used the same cheap cotton.

My process for the Cream Kirtle started in the same way that the process for the Blue Kirtle started. I cut out the pieces in interlining fabric. This time I used two layers of linen and one layer of the grey horsehair stuff. I didn’t really want it to be any thicker but because the cream linen is so light you can see the grey horsehair stuff through it. I didn’t have that problem with the Blue Kirtle because you can’t see the grey through the deep blue. Using two layers of the heavy white linen means that you can’t see the grey stuff through the cream stuff. Here’s a picture of those three layers:


As with the Blue Kirtle, my next step was to stitch the layers of interlining together. I used running stitch. Next step: cutting out the top fabric. I cut out the lining fabric at the same time to make sure it was the same size and shape as the top fabric pieces. I was pretty careful at this step because I think that wrong cutting-out of my lining fabric contributed to the shoulder-lumping on the Blue Kirtle. I also used a slightly smaller seam allowance this time and I didn’t have to trim any off. After all the cutting-out I used a big running stitch to baste the top fabric to the interlining.

Picture for proof:


And then, herringbone stitch! I remembered to take pictures of my herringbone stitch this time so you can have a look at how I did.

Along a straight edge:


Around a curve:


The next step after the herringbone stitching (which took forever, it’s such a slow part of the process) was to sew the seams. There were many more seams on the Cream Kirtle than there were on the Blue Kirtle. I sewed the side seams first and then the shoulder seams. I don’t really think that the order would have made a difference, I just did it in that order because I thought it would be better to sew the longer seams first. I used back-stitch because it’s good for seams. After I sewed the four seams (two side-seams, two shoulder-seams) on the top fabric, I sewed those same seams on the lining fabric.

Next, I pinned the lining fabric into the bodice. I started by matching the seams and then I tucked the seam allowance all under and pinned that down. For around the armholes I did the same thing, using little snips to be able to fold it in neatly. Interestingly, I was watching the “Jersey Shore” episode of Bones whilst doing this. I don’t know why I remember that. Anyway, I then sewed down the lining using slip-stitch. Here are a couple of pictures of the lining all sewed down:


I’m pretty happy with how the bodice has turned out so far. It doesn’t have any weird lumping that I’ve noticed yet and I think my sewing was mostly quite neat. The only part of the bodice that I’m not as happy with is the back panel, which is a V-shape. I’m not happy with it because it turned out not-very-pointy. I tried to make it pointy but it didn’t turn out very pointy and I don’t know how to increase the pointedness. Here’s a picture of how it turned out:


*sigh* Oh well, it will do.

I’ve done a bit more work on this dress but I haven’t taken pictures yet, so I’m going to keep this blog post short and sweet and leave it here.

The rest of what I’ve done is: cut out the skirt pieces, do the pleating, attach the skirt, sew the side-seams.

What I have left to do is: a bunch of finishing, remove basting stitches, a bunch of lacing-holes.

UPDATE: I may have done this stuff already (but not on the blue dress yet).

Hopefully by the next time I blog I’ll have completely finished both dresses! I should be able to sum them up in one post (with pictures)!

Thanks for reading :)

♥Nancy♬

09 January, 2013

16th Century Blue Linen Kirtle


Hi everyone! It’s been a long time since I did a garb diary. Usually that wouldn’t be a big deal but this time I’ve actually been sewing. A lot.

Armed with the AMAZING pattern that Rosie helped me with (read all about that process here) I began work on my first kirtle. I decided to start on the side-lacing one because I’m making that one in my blue fabric, and blue is awesome and should come first every time!

I started by cutting out my pieces in my interlining fabric. For the interlining for these kirtles I’m using a combination of heavy linen (I’m pretty sure it’s the 8 oz/yd2 IL090 from Fabrics-store.com in Bleached, or maybe Optic White, I can’t remember exactly) and some sort of horsehair fabric that I found at Spotlight. I wanted horsehair canvas for its stiffness and I don’t think that’s exactly what I found, but it feels like natural fabric of some kind and it has no stretch to it at all, which in the end is the point. The heavy linen is stretchy (because it’s linen) so I added the horsehair whatsit stuff to stop it stretching (interlining needs to hold its shape). Anyways, after I cut out the pieces in exactly the same size as my pattern I then sewed them together. For the first dress, the blue one, I just used 1 layer of linen and 1 layer of the horsehair stuff.


Here’s a picture which kinda shows that. The grey-ish fabric is the horsehair stuff.

I sewed the layers together using running stitch around the edge, and then I put the pieces onto my blue fabric so that I could cut out the top layer, with appropriate seam allowance. The linen I used was the 5.3 oz/yd2 IL019 from Fabrics-store.com and I think the colour was Pacific Blue but I can’t remember or find where I put that information... Anyway, the following picture demonstrates how I went overboard with the aforementioned seam allowance; you can also see my running stitches on the interlining.


Once I had cut out both top pieces in my beautiful blue linen I basted the interlining to the corresponding top piece using a big running stitch. This was the only part of the process that I used definitely incorrect materials (I’m still not sure if my horsehair stuff counts as a period-accurate material but at this point I’m giving myself the benefit of the doubt). I used crappy cotton thread to do the basting. I used this because a) it was really low-quality random thread that we had laying around, as opposed to my fancy linen thread and b) because the basting stitches get pulled out at the end anyway so it didn’t really matter that much.


See the above picture: basting. Also, too much seam allowance.

My next step was to use herringbone stitch to attach the top-fabric to the interlining. I didn’t take any photos of my herringbone stitch, unfortunately. But basically I started about two finger-widths in (to leave room for finishing edges after I attach the skirt) and herringbone-stitched the whole way around, leaving the top of the shoulders open so that I could sew the seam later. I was pretty happy with my herringbone stitch, I think I did lots of nice small stitches and I made sure I never went through to the top fabric so it’s basically invisible now.

Cutting too big of a seam allowance caused some issues when I was doing herringbone stitch up around the shoulders and then when I was sewing the shoulder seam, but I fixed that problem by trimming down the seam allowance.

My next step was to sew the shoulder seams. I used back-stitch because that’s a nice strong stitch and the shoulder seams have to be particularly strong. On a side-lacing kirtle the only seam is the shoulder seam, because where side-seams would be otherwise there will be lacing on this dress. One of the shoulder seams went just fine but the other one turned out kinda lumpy. I don’t know what I did to make it go like that, but you can’t tell on the finished thing so I guess it sorted itself out.


I then cut out the lining fabric. My lining fabric is white linen, again from Fabrics-store.com, but I can’t for the life of me remember whether it’s the 5.3 oz/yd2 or the 3.5 oz/yd2. I cut out the lining fabric with too much seam allowance too and had to trim it down also. Once I’d cut it out/trimmed it down, my first step was to sew the shoulder seams. After that I pinned it into the rest of the bodice and then I tucked all the seam allowance in and sewed it down using slip stitch. I left a little gap at the bottoms (about two finger-widths) for finishing and sewing on the skirt.

I had a similar lumpy problem when I was sewing the lining down around the shoulder seams. In the following picture you can see some lumping:


The lumping isn’t too bad really, it just looks a bit messy. I couldn’t work out how to fix it up though so I’ve just left it that way. It’s on the inside so I don’t think it really matters that much. The other side turned out just fine. Here’s a picture of what the shoulders look like along the edges:


Here are a couple of pictures of the lining sewn down on the bodice, so this is what it looks like on the inside. I especially took pictures of corners and stuff because they are fiddly bits.


So that was the bodice pretty much finished, except for lacing holes and finishing off the edges at the very bottom. My next step was to do the skirt and that is where things went kinda wrong. I decided to do a bit of shaping at the top of the skirt.

This was my process: I measured the edge of my bodice, I folded and cut my fabric in half, I cut the diagonals at the top for the shaping.

The problem? I’d measured the shorter part of the bodice. I hadn’t even thought about the fact that the two pieces of the bodice have different length edges. Noooooo it was a disaster! One of the pieces was the right size but the other one was not. If I hadn’t already cut my diagonals I could have just rotated it (not ideal, but it would have worked) and cut different diagonals and it would have fit perfectly. But I had cut my diagonals so I freaked out and cried everywhere until mum came home to help.

We remeasured my edges, recalculated the lengths of fabric I needed and tossed around ideas of how to make it work. In the end I rotated to the too-small piece, which made it approximately the right size, and cut new diagonals even though they were smaller than the diagonals on the other piece. In the end I still have an unfortunate diagonal at the top and bottom on one side, but at the top it should be lost in the waist seam and hopefully at the bottom it will be lost in the hem, so no harm done in the end.

Now that my skirt-cutting drama was over, I was able to pin the skirt onto my dress. I lined up the seam allowances at the edges and pinned it in place and then went around pinning my pleats. I decided to do a box pleat in the middle and knife pleats fanning outwards because I think that looks nice. I had measured my skirt so that I would have three times the length of the bodice and I did tiny perfect pleats of 1cm width. I say perfect, I am seriously exaggerating when I say that. I ended up with the same number of pleats on both side (of the middle, not on both sides of the dress) but it took some wiggling. It’s very hard to get accurate pleats.

Once I’d pinned my pleats I used backstitch to sew the skirt on. I tried to sew it in such a way that I got some of the stitches into the interlining as well, so that when I removed the basting stitch it wouldn’t flap around at all at the bottom of the bodice.


Here is the skirt all sewn on and back-stitched and pleated. I’m pretty happy with it.


And here it is on the outside. The pleats don’t look entirely even here, even though I think they are pretty close to even. When you hold the dress up they look more even so it should look pretty okay when I wear it.

After the skirt was sewn onto both sides of the dress my next step was to sew the side-seam down the whole length of the skirt. I did it with back-stitch and it was a pretty uneventful step in the process.

Then I had to deal with this mess:


This is what it looked like at the bottom of the bodice. It’s excess seam allowance and that sort of thing and it needed to be neatly tucked down and finished off. I was quite unsure how to get that all working. It took looks of folding and poking and prodding and pinning and, eventually, stitching. Here’s how it turned out:


It think it looks pretty okay in its finished form. The folded bit down the edge is the edge of the skirt-opening. I folded it in and sewed it down using slip-stitch and it continues into the seam of the skirt where it then turns into a flat-fold finished seam.

Pictures for proof, the edge:


Pictures for proof,  the seam and finishing on the inside:


That all went quite smoothly, except at the top where the seam-opening starts. I had to find some way to make that all be finished edges so that it didn’t fray to pieces and, well... just look:


So... it turned out kinda messy. That’s the inside, of course, so it’s not really a huge deal. In order to make it look neat and tidy on the outside I think I will try to sew a little buttonhole-bar, just to give it strength and neatness at the bottom. For now, though, it looks okay so I’ll probably do that as the last thing before I wear it.

I finished off the bottom of the bodice, over the skirt seam:


And then, goodbye basting stitch!


Yay! It’s looking quite good.

So what’s left to do on this dress? Well, it’s not wearable until I sew some lacing holes. The reason I haven’t done that yet is because I don’t have an awl. However, an awl is a belated part of my Christmas presents from mum and dad so when it arrives I will be sewing about a billion lacing-holes.

I asked a garb expert (Rosie, again) what colour my lacing holes should be. She told me that lacing holes in English garb are the same colour as the fabric. If I were sewing Flemish garb I might have just used my same natural-coloured linen thread to do the lacing holes. But I’m definitely English rather than anywhere else so I will be doing the lacing holes in matching blue thread. Linen thread is hard to find and even harder to colour-match, so I pulled a bunch of long threads out of my excess blue fabric. The lacing holes should end up pretty much invisible, as long as I sew them well!

I also have the bottom hem to go, but I’m planning to leave that until my lacing holes are done so that I can be properly wearing the dress when it comes time to measure the hem. I think that will make it the most accurate length-wise.

Without an awl I am currently stuck so I have left this dress alone for now. I’ll work on it more when I have an awl. In order to keep myself busy while waiting for that important tool, I started work on my next dress, yay!

But this post is pretty long already so I’ll blog about my next dress another time (maybe once I’ve made some more progress on it).

Hope this was an interesting read!

♥Nancy♬

14 August, 2012

Patterning Success!


Hello again! I'm up to my 5th post this month, wow! You guys must be sick of me lol :P

So first of all, you know that page I posted in my last blog post of the Splendor Solis manuscript? Well, I couldn't find a nice-quality not-watermarked image on the interwebs, but I opened up The Tudor Tailor the very next day to find a whole-page version of that same page. *facepalm* anyway so I've had a closer look at it. It's pretty amazing.

Anyway, what I want to blog about today is patterning because over the weekend I had some epic success at kirtle patterning.

I said "I" had some success there, obviously I don't mean that "I" had the success. "I" succeeded only in that I stood about and got my arms out of the way while other people did the work, and by the end I was in possession of a kirtle pattern for myself.

So this Sunday was the Eric & Enid tourney. I've heard that it was actually very good. I umm-ed and ahh-ed over going but in the end I decided not to because Sunday was the best day that Rosie was available to come round and help me do patterning. In the end I'm actually glad that I stayed home to pattern, because I got useful stuff done and didn't get rained on!

Rosie came round just before midday. It was so good to see her! Anyways, my mum wasn't home for like 45 minutes after that but we got on with all the preparation stuff.

Patterning Tip: use a double layer of fabric for your patterning!!

This was something that I honestly did not even think of. Aimee & I had just used 1 layer of fabric, mum & I just used 1 layer of fabric... it never occurred to me that the 1 layer thing could be a problem.

So to start off, Rosie cut out two backs and two fronts of approximately the right shape in calico (she did that while I set up the sewing machine). Then I machine-sewed around the edge of the two fronts and then did some vertical lines down to hold the pieces in place. I did the same to the back. Now we had one back piece and one front piece, both double-layered with lines all down them.

I'll take a moment here to mention that I didn't take any pictures while we were doing this. It's not a super-flattering process tbh and anyway it's hard to represent the patterning process in pictures. You really have to see it happen to understand it, imo.

Next I put on a chemise and took off my bra - you absolutely cannot pattern with a bra on because then you have to wear a bra with the dress. Then we pinned the pieces together and I put it on. When I tried patterning with Aimee and with mum, I didn't wear a chemise, we just did it with naked skin. The pros of this method were that it was easier to adjust myself without all that chemise fabric in there. The cons are that I will be wearing a chemise with the final dress so it made sense to pattern the dress over a chemise.

So, with a chemise on and the two halves of this bodice pattern pinned fairly loosely to me, what was the next step?

Well, first of all Rosie pinned all the side seams in so that the bodice was actually starting to become approximately my shape. Then I adjusted my bust and she pinned the side seams a bit tighter and then adjusted the shoulder seams, which provide all the lift in the bust, apparently.

The bodice was properly on me at this point, but it was not really that fitted and it also had lots of excess fabric all over the place. The first excess fabric problem that we solved was the length.

Patterning Tip: a Tudor kirtle bodice should come to just above your lowest rib, by about 1cm or 1 finger-width.

I had seen in plenty of pictures that kirtle bodices tend to be quite short, but I didn't really think about it until Rosie told me to find my lowest rib and then she said that the bottom of the bodice would be above that point. It seems counter-intuitive but the logic behind it is totally sound: if it's higher above your natural waist, you've got room and flexibility to bend all about the place and actually get on with doing things.

Patterning Tip: snip to the first wrinkle.

This is true for the waistline of the bodice but it's also true for the armscye (arm-hole). When you snip up to the first wrinkle, the tension in the fabric is released and most of the other wrinkles will just vanish! This means that you're snipping up to the best level to allow for movements and good fitting and all that stuff.

We did more adjusting. The adjusting process is pretty simple for the person being fitted (me). All I had to do was arrange my bust so that I was supported (or at least so that I was holding up my bust). But Rosie really needed to strong finger muscles! She pulled in the side-seams first. I think she mostly started by pulling in the under-bust side-seam pin, and then did all the other pins along the side-seam. At the point I could let go of my bust but she would then adjust the shoulder seams to pull everything upwards.

Then it was time for more snipping. Again, Rosie followed the rule of snipping to the first wrinkle. She checked that the waistline was okay but after the first adjusting it didn't actually need much more snipping. Then she did the armscye which needed more adjusting than the waistline. You have to be really careful when making snips in the armscye because snipping a little too much can really ruin it. Rosie was so meticulous though, it all turned out perfectly.

In all the snippy parts, Rosie turned the tabs that remained under the rest of the bodice, so that it made a smooth line and you couldn't see all the tabs sticking out. This was really helpful when we finished adjusting because it made it easier to look into a mirror and see what the final thing would look like - I didn't have to "look around" all the sticking out bits, because they were tucked away.

This process of adjusting, re-pinning, snipping, adjusting adjusting re-pinning re-pinning snipping re-pinning... it went on for a really long time!! But in the end I had a nice tight bodice that was supportive and seemed to fit really well.

The next thing was that Rosie drew on all the lines. She drew on all the lines down the seams and where the straps would be and along the waistline and along the back-neckline and the actual neckline and basically just everywhere there were lines.

Then I got unpinned and could go put on real clothes, yay!

Patterning Tip: if the sides are different, choose the smaller one.

The sides of our toile were actually pretty different - and I don't think it's because I'm that lopsided lol! One of the sides had much wider straps, for example. We determined that it was the more supportive side and chose to go with this one. All we had to do was cut straight down the centre of each piece so that we isolated the good front half and the good back half. We made a few changes, like making sure that the shoulder seams were the same length, and that the waistline was smooth and that sort of thing. The side seams were, conveniently, the same length already, woo!

Mum wanted to make the underarm part more "square" - apparently that's a modern sewing thing. Rosie said no. It was pretty interesting. Mum accepted in the end that we wouldn't change the underarm part at all because part of the supportiveness is in there. But I think she was upset because "that's not how she learnt it" or whatever. I don't even know.

Aaaaaand that was the whole fitting process. Overall it took about 2 hours. That seems really long but apparently some fitting can take a whole day so I was pretty happy with only 2 hours!

I'm going to cut my pattern out in cardboard so that I have it saved for later use.

The only decision left to make is what, exactly, I'm going to use for interlining. I think I will use one full layer of calico and then do a smaller part basted on of canvas or horsehair buckram stuff. Apparently it's very good, and period. Hmm...

So I owe a HUGE thank you to Rosie. Also thank you to Aimee and to my mum, who helped out. But mainly thank you to Rosie, for straightening out all the kinks and finally getting my pattern to be perfect.

I'm really looking forward to getting started on my dresses. Blog-readers: I'll keep you updated!

♥Nancy♬