Hi everyone!!
Here I am blogging twice in the same month! I *may* have made a New Year's Resolution that was something along the lines of "I will blog twice every month."
What this means is a) more blog posts from your favourite blogger (perhaps it is presumptuous to assume that I am your favourite blogger, but in response to that I say: shush!) and b) less awesome creative writing posts and more posts that are a bit rambly and/or about gossip/SCA events/sewing (probably).
This one, today, is about sewing.
So sometime last year I blogged a little about my current sewing projects. Now I'm going to update you on those and tell you about my plans for the future as well!
My sewing project over the last few months has been Practise Kirtles.
Yup, Practise Kirtles are officially a thing.
What they are, is kirtles that look like, you know, kirtles, except that they are made out of cotton drill, because it's nice and cheap, and they are a little bit shonky because they're my first attempt at actually sewing anything :P
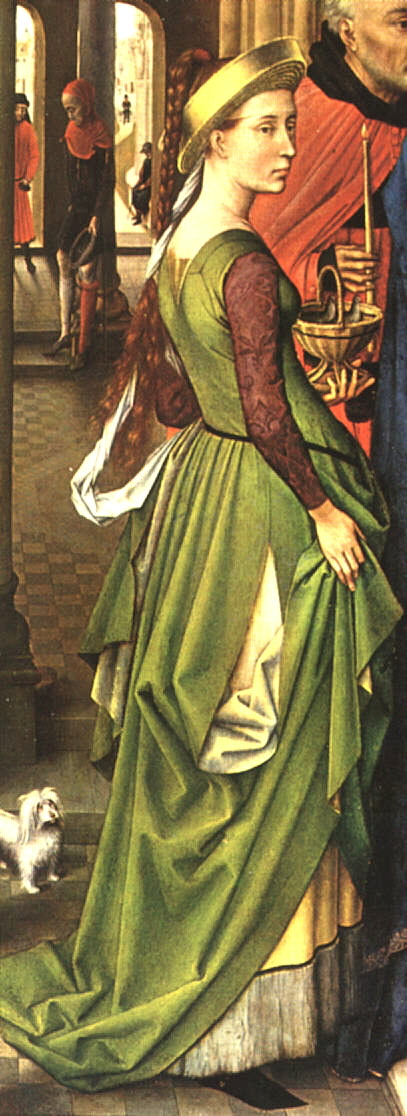
Actually, if you don't know kirtles, here are some places you can see pictures:
http://bjws.blogspot.com/2011/01/finding-cooking-food-in-16th-century_28.html (in particular the 8th pic down)
Aaaaaand that's probably enough for you to be getting on with :P the kirtle is the (relatively simple) dress that women wore from the 15th century right through the 16th century. There are many different styles, as you probably noticed if you looked at some of those pictures! A difference between the 15th C. and 16th C. kirtles seems to be that in the 15th C. they were mostly cut all in one piece of fabric! In the 16th C. they usually look like they are a clear bodice and skirt (sewn together though, not separate pieces).
My personal preference is for the slightly later kirtles. I love the look of the simple bodice & skirt (must be worn with a belt, too) especially with a cute hat and maybe an apron.
The time period is from about 1500 to I guess 1550. Maybe a bit before or after that cut-off. Fashion got weird for everyone in 1558 when Queen Elizabeth took the throne. She was such a snappy dresser as a teenager (see here: http://en.wikipedia.org/wiki/File:El_bieta_I_lat_13.jpg) and then she got old and wore ugly stuff (my apologies to those who actually *like* Elizabethan garb, I do mean this all tongue-in-cheek, of course). Case in point: http://en.wikipedia.org/wiki/File:Elizabeth_I._Procession_portrait_(detail).jpg yeah, she wore that in public...
.jpg)
The kirtles I've been looking at were mostly worn by the middle class people, or maybe lower class. The upper class people dressed pretty spectacularly too (http://en.wikipedia.org/wiki/File:Mary_Tudor_and_Charles_Brandon.jpg) but clearly it takes someone who can actually sew to make something that cool, so I'm saving that for a later time when I have furthered my sewing skills.
My inspiration comes partly from pictures like the ones I listed above (the kirtle ones, in this case) but mostly it comes from Sophie. Her blog is way better than mine and here are some of her posts with pictures of the sort of clothes she has that have inspired me: http://scananigans.blogspot.com/2009/12/new-scadventure.html and http://scananigans.blogspot.com/2010/03/festival-garb-update.html and http://scananigans.blogspot.com/2010/08/banner.html
She has some very good pictures on facebook so if you know her then I would encourage some stalking to find the outfits that I'm thinking of. I just figured it would be best not to post links to her facebook all over my blog. (Also I'm linking to her blog entirely without any permissions whatsoever so... hope you don't mind, Spoh!)
Oh also, the kirtle/petticote distinction is really complicated and tbh I don't understand what is a kirtle and what is a petticote at which time and class etc. so I'm just calling everything a kirtle but be aware that technically some of these things *may* actually be petticotes. But whatever and on we go...
Anyway, now that we're past all that informative preliminary stuff, let me tell you about my Practise Kirtle project.
Step 1: get fitted for a kirtle (Pattern Mark 1)
Big thanks to Rosie who fitted my first kirtle pattern. We did it a very long time ago, maybe December 2010? I'm pretty sure I was still in a relationship with Luke at that point, wow! Anyway, it was a long time ago. It was a really good pattern.
Unfortunately, since it was such a long time ago, I kind of changed in weight over the course of time passing... and no longer fit the pattern. D:
Which I was not at all happy about.
Step 2: get fitted for a kirtle (Pattern Mark 2)
So I had grown out of my original pattern (*epic sad*) so of course I needed another one now.
Using the beautiful pattern that Rosie had made for me as a template, we cut out the bits and mum & I set out to make a new pattern.
I'd never patterned anything before and neither had mum, but I'd been patterned in the past for my black Italian dress, my corset and of course the kirtle pattern that Rosie did.
Using my limited knowledge and mum's useful skill of being good at everything, we managed to achieve a pattern.
It was a bit of a gamble, I'll admit, using a pattern that mum & I had made. Let me tell you though, it actually did pay off in the end.
Step 3: make a bodice (Fail Bodice)
I have a copy of The Tudor Tailor and I've had it for quite a while now. In it, there are specific and relatively simple instructions on how to make a kirtle.
I did not follow these instructions.
Instead, I chatted to mum about general sewing stuff and I made up my bodice based on a general sewing principal of "sew right sides together; turn inside out; voila."
OH GOD I FAILED.
Like, you have no idea how much I failed, it was actually the worst thing ever in the whole world. I felt pretty bad about it... I was a disgrace to the noble art of sewing. And I disgrace to the entire Tudor era.
Seriously. FAIL.
In the end, mum fixed it up. It doesn't look like your average Tudor kirtle bodice but it looks like a slightly-non-fail bodice now. Thanks mum! It took someone who has been sewing for, like, her whole life to mend my epic fail. D:
*waaaaaaaaaaaa*
And now onto...!
Step 4: ask Aimee and Ellen - who have been taking sewing classes with Sophie and making these fancy medieval clothes properly for longer than me - how to do this properly. Also cross-reference with the Tudor Tailor. Also ask Sophie. (The Learning Stage)
Okay, so asking the experts may have seemed like the obvious thing to do, but I guess a part of me had wanted to just suddenly be brilliant all by myself. But I really wasn't brilliant at all (cf: FAIL).
So I chatted to Aimee and Ellen, because Aimee makes lovely kirtles and Ellen had been doing sewing with Sophie, so they were both pretty much experts. I even drew pictures and made notes. In bright texta colours, too. It was a phase. I also took all my STATS notes in bright texta colour, so there you go.
Anyway, they gave me some good advice. Then I read the Tudor Tailor and talked to mum about it some more, and we started to work out more and more what I was *meant* to be doing.
And *then* I spoke to Sophie, and that was just so much better than everything else tbh because, really, she's a genius at sewing and especially at the sort of kirtles that I wanted to make, so hearing her take on it all made me a) way more confident and b) feeling informed enough to actually get on with the sewing.
Step 5: make a bodice and attach a skirt (Front-Lacing Kirtle)
So, following the instructions that Aimee and Ellen and Sophie had given me and cross-referencing with instructions in the Tudor Tailor and also what mum thought, I began the process of constructing my kirtle bodice - properly this time!
Here's how I did it:
1. cut out approximate bodice shapes (no straps; front panels only) in buckram - I was using buckram because it's a) cheap and b) a good stiff fabric to make a supportive bodice
2. cut out same shapes in calico
3. cut out entire bodice shape (seam allowance at seams only) in calico
Oh I should mention that this bodice is made in three pieces: a back piece, a left front and a right front. There are scenes at the sides and lacing down the front.
4. the layers go like this: the calico panel with straps, then the buckram, and then the other piece to go over the top of the buckram (because buckram is spiky at the edges and I don't want it to poke me)
5. sew channels in which to put boning. Basically at this step I sewed along the bottom and up the sides, leaving it so that the top part was opening. I didn't have to do anything with the back panel btw. On the front panels, it was the calico piece with straps now attached at the bottom and sides to the other pieces. Then I sewed lines down the pieces, wide enough to fit cable ties (I'll explain that soon).
6. put in cable ties - in period they would have used whale bone or maybe cane rods to bone their dresses but today cable ties are a great substitute. I just slotted them into the channels that I'd sewn. Then I had to cut them off at the top because they were too long. Of course, cable ties are a rectangle and you get sharp corners when you just cut them straight, so then I used fire (woo!) to melt the corners into rounded bits so that they wouldn't poke anything. Then I sewed over the top part to seal in the cable ties and voila! Two front-pieces done.
7. cut out pretty fabric (with seam allowance and also plenty of edge allowance) - cut all 3 pieces
8. baste calico bits (with cable ties now!) onto pretty fabric - basting is just running stitch. It can be pretty loose, it's just used to hold the bits together before you seal them together some other way.
9. sew side seams and also shoulder seams (I hope I'm not getting these steps that I did out of order)
10. use herringbone stitch to sew the edge allowance down; this seals the inner part to the pretty fabric. Herringbone stitch looks like this: http://www.embroiderersguild.com/stitch/stitches/herringbone.html and it's actually pretty fun and easy. IMHO I got pretty good at it. Sometimes to get round corners you have to do clipping, where you cut the pretty fabric to make it fold down smoothly. It's all on the inside in the end so that's cool.
11. cut out lining fabric (with edge & seam allowance); sew side seams
12. baste lining to combined inner & pretty fabric piece
13. use hemming stitch (I actually used slip stitch, which is like this: http://www.wikihow.com/Slip-Stitch) to sew down the lining. This process hides the herringbone stitch and the entire inner parts, so that all you can see at the end is the pretty fabric on the outside and the lining on the inside
14. I did the arm-holes with bias. This was pretty complicated and not fun so I'm not going to detail it all here. It's what the Tudor Tailor says to do but in future I will just keep herringbone stitching and clipping around the corners (I think this step actually came before #13, btw)
At this point, the bodice was complete. Here's how I turned it into a dress:
15. take skirt fabric: pleat. Pleating is actually pretty easy, but I got mum & dad involved and they got all calculator-brained and I ended up having to measure every single fold. Learn about pleating here: http://en.wikipedia.org/wiki/Pleat I used knife pleats with one single box pleat at the centre back, because Aimee sometimes does box pleats and they look really cute :3
16. keeping pleats pinned, sew (right sides together) the skirt to the bodice
17. OH NO I forgot to mention earlier that you don't sew down the lining along the bottom of the bodice and now I can't be bothered going back to edit it...
18. sew down the lining so that it finishes off the bodice and covers up where the skirt is sewn on
19. hem
20. wear and look awesome!!
And that is how it all happened.
Oh wait:
21. make lacing holes, which involves poking the hole (although we punched out the holes) and whip-stitching to make it strong and prevent fraying
Okay now it's done and wearable :P
This blog post ended up REALLY long. I am so sorry guys.
If you read all this way then you are AWESOME and I LOVE YOU.
I wanted to blog about both my Practise Kirtles in this post but you know what? I think I might post again soon with details of the second Practise Kirtle, because this is just ridiculous, and now I'm going to let you go.
♥Nancy♬